Using the Segmenter
This tutorial will guide you through creating a complete segmentation inspection using the OV20i's AI-powered segmentation capabilities. You'll learn how to detect and analyze specific features like pencil marks, scratches, or other defects by teaching the camera to identify and measure these features pixel by pixel.
What You'll Learn:
- How to set up a segmentation recipe from start to finish
- How to train an AI model to recognize specific features
- How to configure pass/fail logic based on segmentation results
- How to optimize segmentation performance for production use
Real-World Application: This tutorial uses pencil mark detection as an example, but the same principles apply to detecting scratches, cracks, contamination, or any other features that can be visually distinguished.
Prerequisites
- OV20i camera system set up and connected
- Sample parts with the features you want to detect (e.g., sheets with pencil marks)
- Basic understanding of AI training concepts
- Access to Recipe Editor and Node-RED functionality
Tutorial Overview
What we'll build: A segmentation model that can detect pencil marks on paper sheets and determine pass/fail based on the amount of marking detected.
Time required: 45-60 minutes (including training time)
Skills learned: AI model training, segmentation annotation, pass/fail logic configuration
Step 1: Create a New Segmentation Recipe
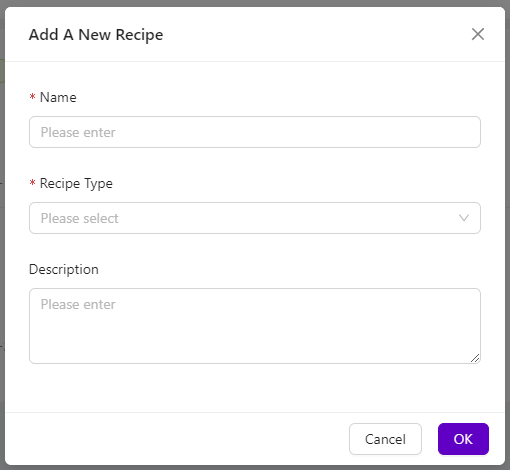
1.1 Start a New Recipe
- From the All Recipes page, click "+ New Recipe" in the top-right corner
- The Add A New Recipe modal will appear
- Enter a descriptive Name for your recipe (e.g., "Pencil_Mark_Detection")
- Select "Segmentation" from the Recipe Type dropdown menu
- Click "OK" to create the new recipe
Why Segmentation? Unlike classification which identifies entire objects, segmentation finds and measures specific features within an image, making it perfect for defect detection, contamination analysis, or measuring coverage areas.
1.2 Activate Your Recipe
- Your new recipe will appear on the All Recipes page marked as "Inactive"
- Select "Actions > Activate" to the right of the recipe
- Click "Activate" to confirm
- The recipe status will change to "Active"

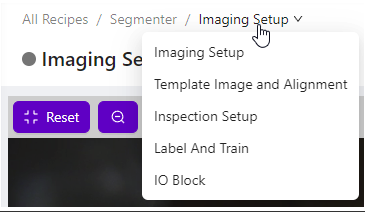
1.3 Enter Recipe Editor
- Click "Edit" next to your active recipe
- Click "Open Editor" to confirm
- You'll now be in the Recipe Editor with your segmentation recipe
Checkpoint: You should see the Recipe Editor interface with your segmentation recipe name in the breadcrumb menu.
Step 2: Configure Camera Imaging
2.1 Access Imaging Settings
- In the Recipe Editor, click "Configure Imaging" at the lower left
- This opens the imaging configuration page where you'll optimize camera settings

2.2 Optimize Focus Settings
- Place a sample sheet with pencil marks in the camera's field of view
- Use the Focus slider to achieve sharp focus on the pencil marks
- You can also enter the focus value manually for precision
- Use Focus View (if available) to see edge highlighting and focus score
Focus Tips:
- Focus on the surface where defects will appear
- Ensure pencil marks appear sharp and well-defined
- A higher focus score indicates better focus quality
2.3 Configure Exposure Settings
- Adjust the Exposure slider to achieve proper brightness
- Pencil marks should be clearly visible without overexposing the paper
- Start with automatic settings and fine-tune as needed
- Monitor the live preview to see changes in real-time
Exposure Guidelines:
- Pencil marks should have good contrast against the paper
- Avoid overexposure that washes out subtle marks
- Ensure consistent lighting across the entire inspection area
2.4 Set Up LED Lighting
- Select appropriate LED Light Pattern for your application
- For pencil marks, even lighting typically works best
- Adjust LED Light Intensity to minimize shadows and glare
- Test different patterns if reflections are an issue
2.5 Adjust Gamma and Contrast
- Fine-tune Gamma to enhance contrast between marks and background
- Higher gamma can make subtle pencil marks more visible
- Lower gamma can reduce noise in clean areas
- Balance gamma to optimize both defect visibility and background clarity
2.6 Save Imaging Settings
- Once all settings are optimized, click "Save Imaging Settings"
- Your camera configuration is now saved for this recipe
- The live preview should show clear, well-contrasted images
Checkpoint: Your camera should produce clear images where pencil marks are easily distinguishable from the paper background.
Step 3: Configure Template and Alignment
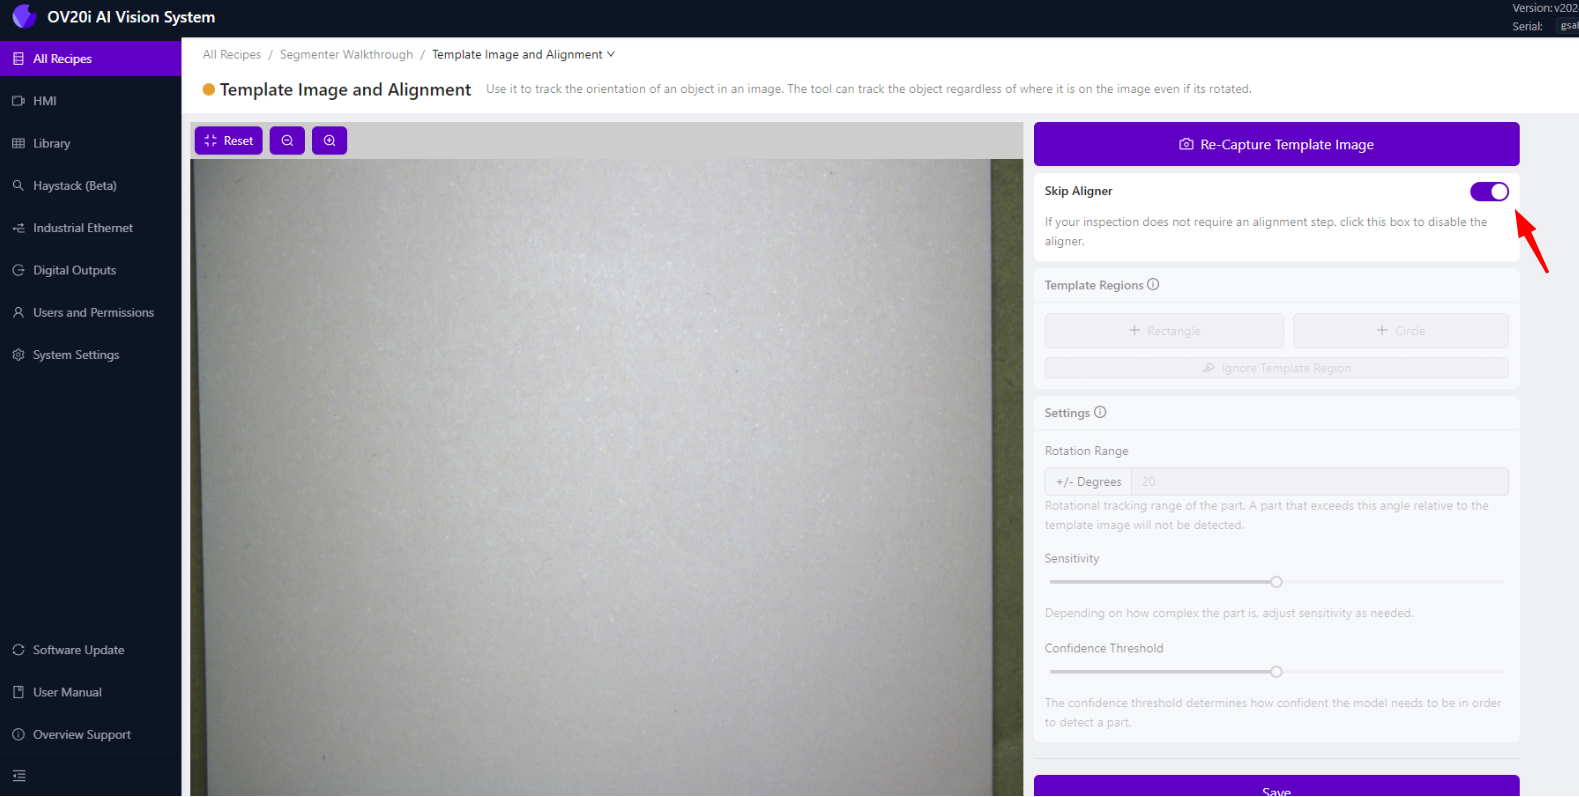
3.1 Navigate to Template Image and Alignment
- Click on the Recipe Name in the breadcrumb menu to return to Recipe Editor
- Select "Template Image and Alignment" from the menu
3.2 Skip Aligner for This Tutorial
- Since we're detecting features across the entire sheet, click "Skip Aligner"
- This disables position-based alignment and uses the full image
- Click "Save" to apply the changes
When to Use Aligner: Enable the aligner when you need to detect features in specific locations on parts that may move or rotate. For full-sheet inspection like pencil marks, skipping the aligner is often appropriate.
Step 4: Set Up Inspection Region
4.1 Navigate to Inspection Setup
- Return to Recipe Editor and select "Inspection Setup"
- This is where you'll define what area of the image to analyze
4.2 Configure Region of Interest (ROI)
- You'll see a preview of your camera's field of view
- Drag the corners of the ROI box to adjust its size and position
- For pencil mark detection, typically cover the entire sheet area
- Ensure the ROI encompasses all areas where pencil marks might appear
ROI Best Practices:
- Include all areas where defects might occur
- Exclude areas like edges or backgrounds that shouldn't be analyzed
- Make the ROI large enough to capture variations in part positioning
- Avoid including text, logos, or other expected markings
4.3 Save ROI Configuration
- Once your ROI is properly positioned, click "Save"
- The inspection area is now defined for your segmentation model
Step 5: Label and Train Your Model
5.1 Navigate to Label and Train
- Return to Recipe Editor and select "Label and Train"
- This is where you'll teach the AI what pencil marks look like
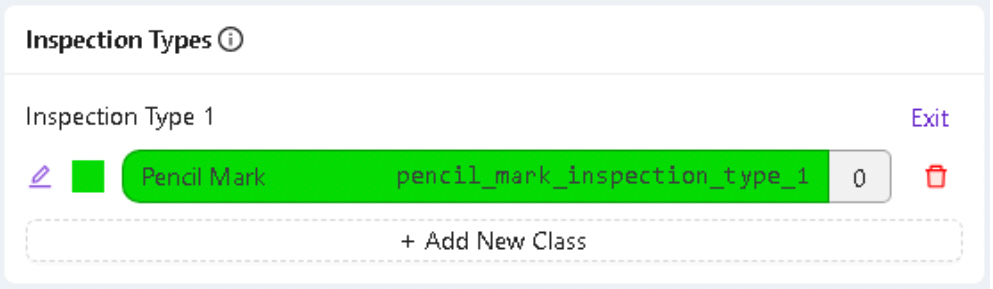
5.2 Configure Inspection Class
- Under Inspection Types, click "Edit"
- Rename the class to "Pencil Mark" (or your specific defect type)
- Choose a distinctive color for visualizing detected marks
- Click "Save" to apply the changes
5.3 Capture Training Images
- Take at least 10 images of sheets with different pencil markings
- Vary the training examples:
- Different pencil mark sizes and shapes
- Light and dark marks
- Various positions on the sheet
- Different mark densities
Training Image Tips:
- Include both subtle and obvious marks
- Capture various lighting conditions you'll encounter
- Include clean areas without marks in each image
- Ensure images represent production conditions
5.4 Annotate Training Images
- For each training image, use the Brush tool to trace over pencil marks
- Paint only the pencil marks - avoid marking paper or other features
- Be precise but thorough in your annotations
- Click "Save Annotations" after completing each image
Annotation Best Practices:
- Be consistent in what you label as "pencil marks"
- Include complete marks, not just parts of them
- Don't label expected markings like text or logos
- Use steady, careful brush strokes for accurate boundaries
5.5 Review Your Annotations
- Double-check all labeled images to ensure accuracy
- Look for missed marks or incorrectly labeled areas
- Re-annotate any images that need correction
- Quality annotations lead to better model performance
Step 6: Train the Segmentation Model
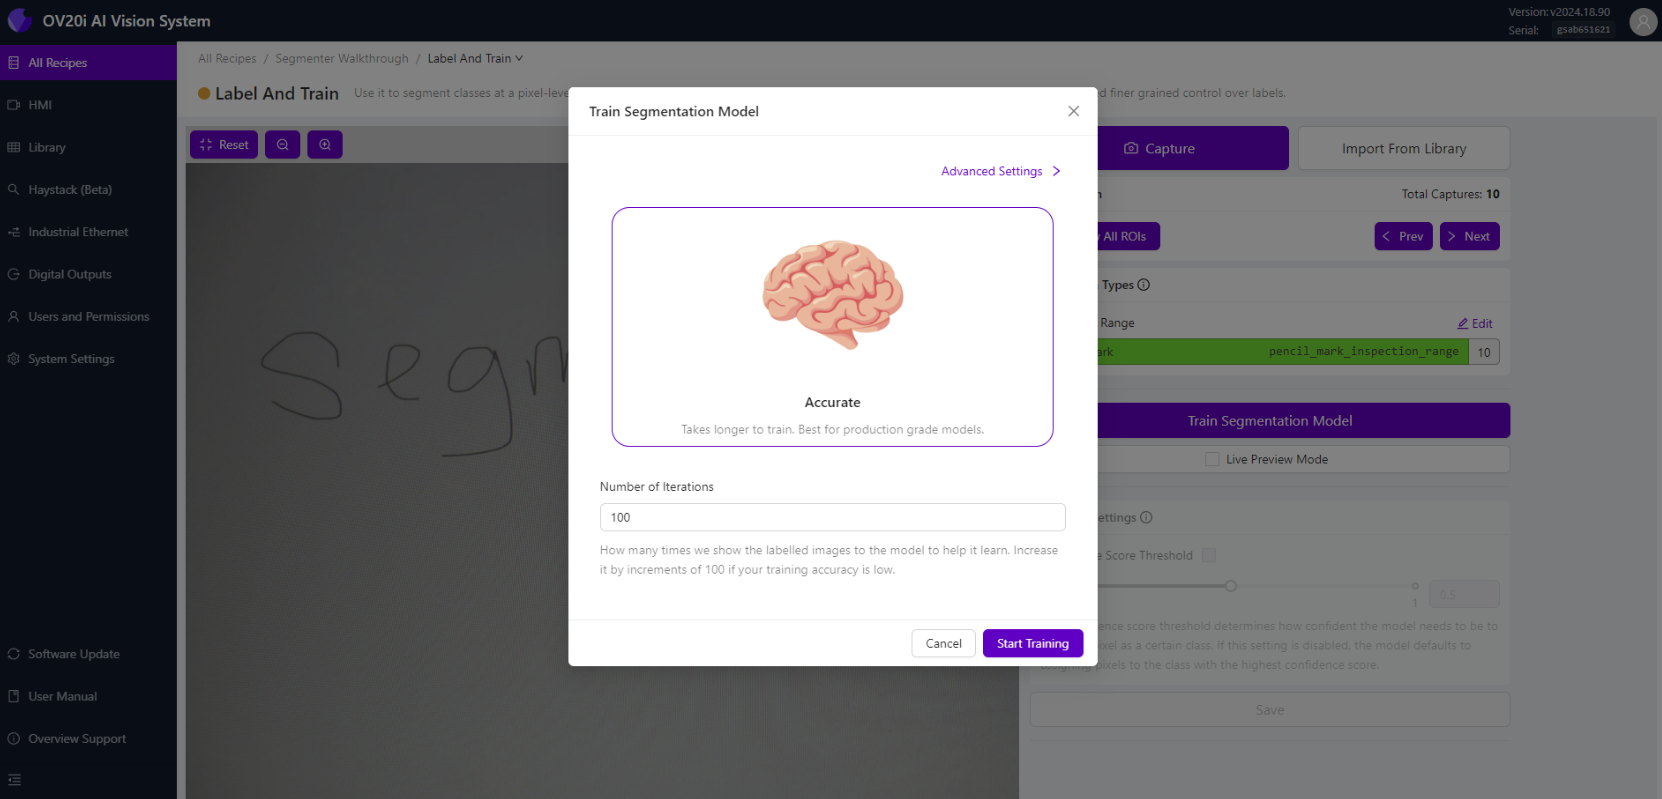
6.1 Start Training Process
- Once you've labeled at least 10 images, click "Return to Live"
- Click "Train Segmentation Model"
- Enter the Number of Iterations for training
Iteration Guidelines:
- Start with 100-200 iterations for initial training
- More iterations generally improve accuracy but take longer
- Monitor training progress and adjust as needed
- Balance accuracy requirements with training time
6.2 Monitor Training Progress
- Click "Start Training" to begin the process
- A training progress modal will appear showing:
- Current iteration number
- Training accuracy percentage
- Estimated time remaining
6.3 Training Control Options
During training, you can:
- Abort Training - Stop if you need to make changes
- Finish Training Early - Stop when accuracy is sufficient
- Monitor Progress - Watch accuracy improve over iterations
Training Tips:
- Training will automatically finish when target accuracy is reached
- Higher accuracy percentages indicate better model performance
- If accuracy plateaus, you may need more training data
6.4 Evaluate Training Results
- When training completes, review the final accuracy
- Click "Live Preview" to see real-time segmentation results
- Test with new samples to verify model performance
Success Indicators:
- Pencil marks are highlighted in your chosen color
- Clean areas remain unmarked
- Detection is consistent across different mark types
- Model responds well to new, unseen samples
Step 7: Configure Pass/Fail Logic
7.1 Navigate to IO Block
- Return to Recipe Editor and select "IO Block"
- Ensure all AI Blocks show as "trained (green)" before proceeding
- Click "Configure I/O" to enter Node-RED editor
7.2 Set Up Node-RED Flow
- Delete the existing Classification Block Logic node
- From the left palette, drag in:
- All Block Outputs node (if not already present)
- Function node
- Final Pass/Fail node
- Connect the nodes: All Block Outputs → Function → Final Pass/Fail

7.3 Configure Pass/Fail Logic
Double-click the Function node and choose one of these logic examples:
Option 1: Pass if No Defects Detected
// Pass if no pencil marks are found
const allBlobs = msg.payload.segmentation.blobs;
const results = allBlobs.length < 1;
msg.payload = results;
return msg;
Option 2: Pass if All Marks Are Small
// Pass if all marks are smaller than threshold
const threshold = 500; // pixels
const allBlobs = msg.payload.segmentation.blobs;
const allUnderThreshold = allBlobs.every(blob => blob.pixel_count < threshold);
msg.payload = allUnderThreshold;
return msg;
Option 3: Pass if Total Coverage Is Low
// Pass if total marked area is below threshold
const threshold = 5000; // total pixels
const allBlobs = msg.payload.segmentation.blobs;
const totalArea = allBlobs.reduce((sum, blob) => sum + blob.pixel_count, 0);
msg.payload = totalArea < threshold;
return msg;
7.4 Deploy and Test Logic
- Click "Done" to save the function
- Click "Deploy" to activate the logic
- Navigate to HMI to test your pass/fail logic
Testing Your Logic:
- Test with clean sheets (should pass)
- Test with lightly marked sheets (should pass/fail based on your criteria)
- Test with heavily marked sheets (should fail)
- Verify results match your expectations
Step 8: Optimize and Validate
8.1 Test with Production Samples
- Run multiple test samples through your inspection
- Verify that detection accuracy meets your requirements
- Check that pass/fail logic works correctly
- Document any issues or edge cases
8.2 Fine-Tune Model Performance
If detection is inconsistent:
- Add more training images with varied examples
- Improve annotation quality and consistency
- Adjust imaging settings for better contrast
- Retrain with additional iterations
If pass/fail logic needs adjustment:
- Modify threshold values in your Node-RED function
- Test different logic approaches
- Consider multiple criteria for complex decisions
- Validate with production requirements
8.3 Production Validation
- Test with real production parts in actual conditions
- Validate with quality team to ensure criteria match requirements
- Document performance metrics like detection accuracy and false positive rates
- Set up monitoring to track performance over time
Step 9: Understanding Segmentation Results
9.1 Segmentation Data Structure
Your segmentation results include:
- Blobs: Individual detected features (pencil marks)
- Pixel Count: Size of each detected feature
- Location Data: Where features were found
- Confidence Scores: How certain the model is about each detection
9.2 Using Segmentation Data
You can create sophisticated pass/fail logic based on:
- Number of defects detected
- Size of individual defects (pixel count)
- Total defect area (sum of all pixel counts)
- Defect location (where defects appear)
- Defect shape characteristics (if needed for advanced applications)
Success! Your Segmentation Model is Complete
Your OV20i segmentation inspection can now:
✅ Automatically detect pencil marks (or your specific features) in images
✅ Measure the size and quantity of detected features
✅ Make pass/fail decisions based on your specific criteria
✅ Provide detailed information about each detected feature
✅ Adapt to variations in mark size, shape, and position
Key Takeaways
Segmentation vs. Classification:
- Segmentation finds and measures specific features within images
- Classification identifies entire objects or overall conditions
- Use segmentation for defect detection, contamination analysis, or coverage measurement
Training Best Practices:
- Quality annotations are more important than quantity
- Include diverse examples in your training set
- Test thoroughly with production samples
- Monitor and retrain as needed
Pass/Fail Logic:
- Start with simple criteria and add complexity as needed
- Test logic with edge cases and borderline samples
- Document your criteria for consistency
- Consider multiple factors for robust decisions
Next Steps
Now that you've completed your first segmentation model:
- Apply to other use cases - Try detecting different types of defects or features
- Integrate with production systems - Connect to PLCs or quality management systems
- Set up data collection - Track performance metrics and detection statistics
- Train operators - Ensure team understands how to monitor and maintain the system
- Plan maintenance - Schedule regular model updates and performance reviews